Definition of selected terms used in this article:
Speed or Sensitivity - Also called the ISO number, is an indication of how sensitive the camera is to light. Higher ISO numbers indicate higher sensitivity. Higher ISO numbers allow photography in low light level situations.
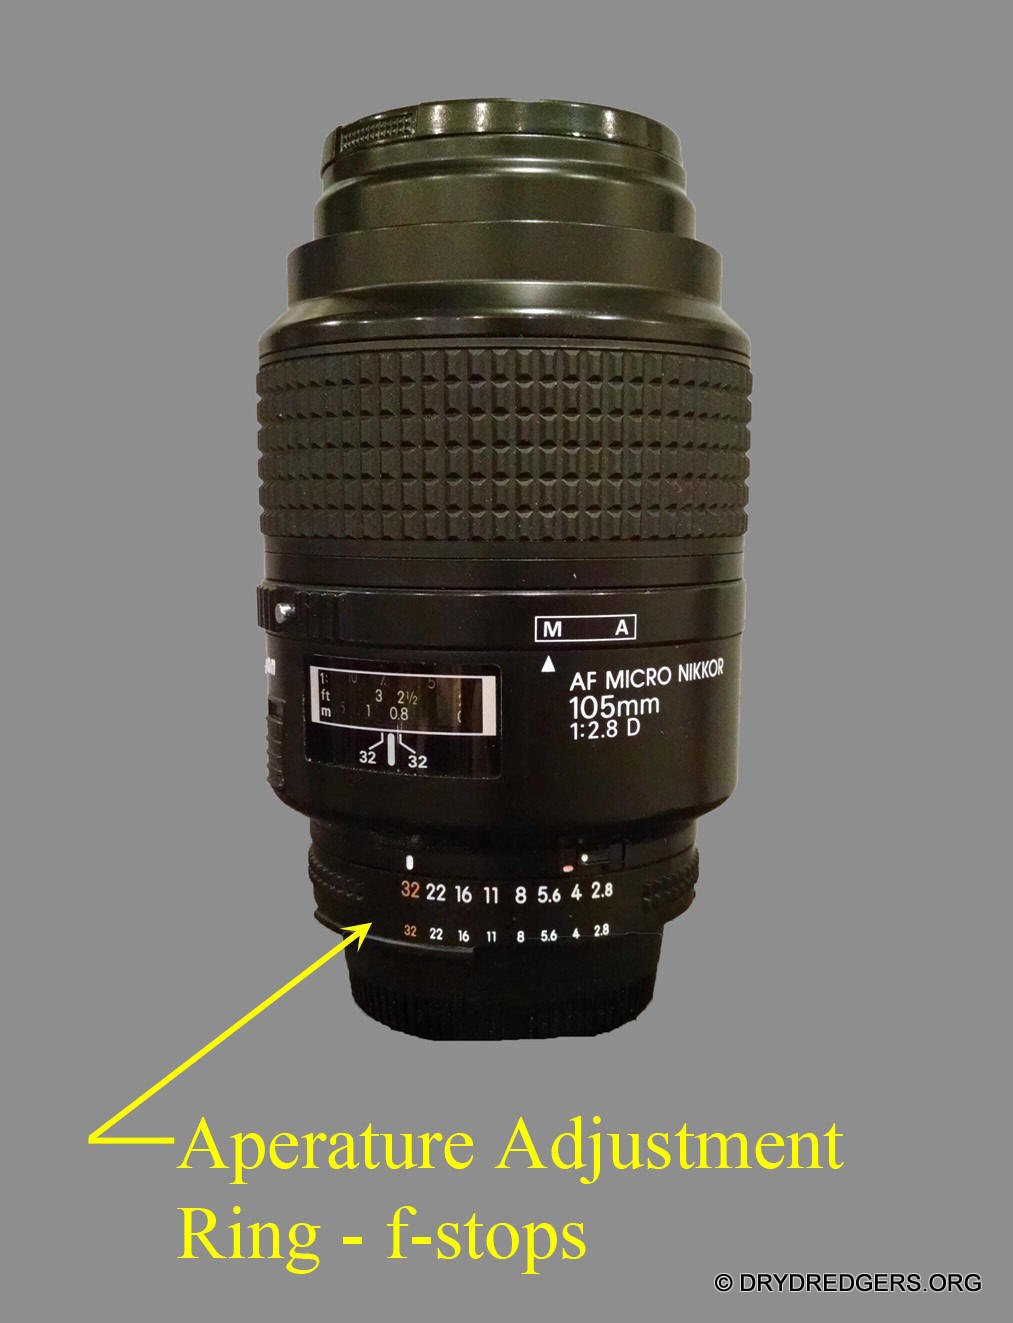
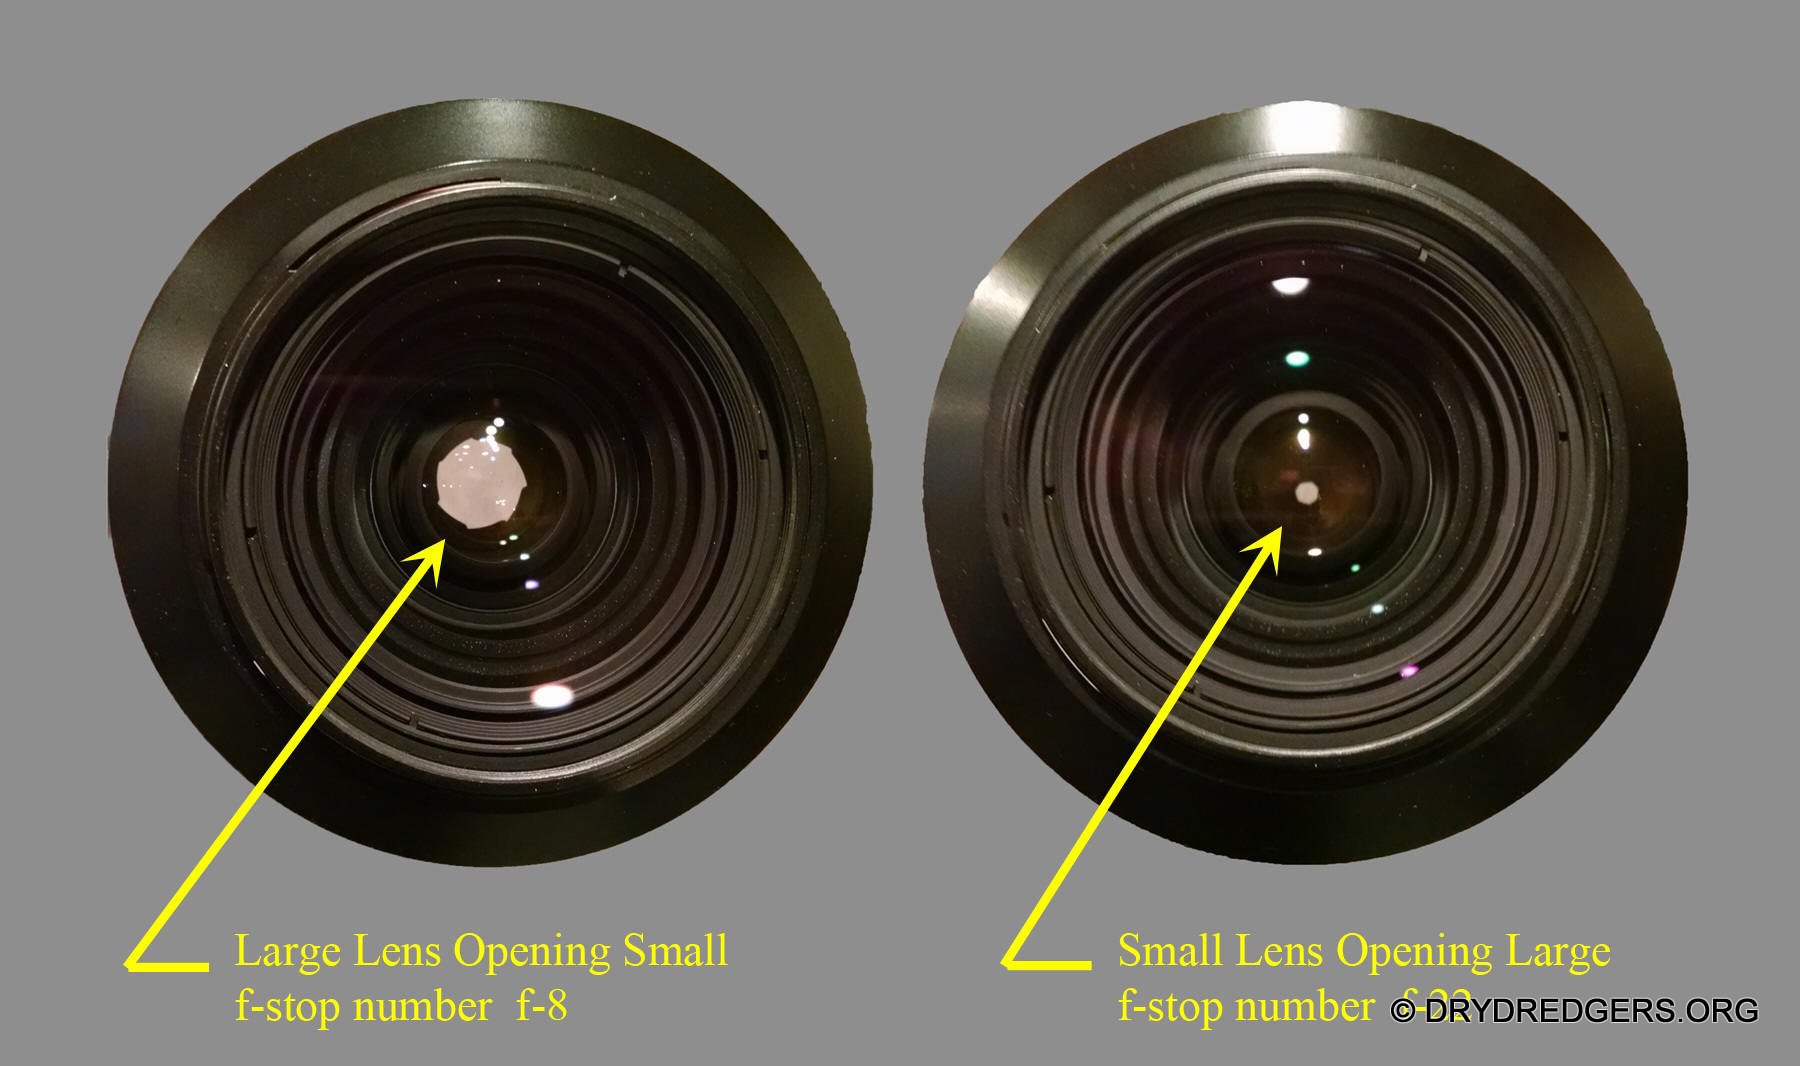
Diaphragm - The metal leaves inside of the lens of a camera that open and close in steps that help control the exposure by allowing more or less light through the lens.
f-stop - Number that indicates how wide the diaphragm is open in the lens. Larger f-stop numbers mean a smaller opening letting less light through the lens.
Depth of field - the physical distance measured from a point in front of the actual point of focus to a point behind the actual point of focus in which all objects appear to our eyes to be in perfect focus.
DSLR - Digital Single Lens Reflex. A type of camera that allows viewing the area being photographed to be seen directly through the lens of the camera.
Speed or Sensitivity - Also called the ISO number, is an indication of how sensitive the camera is to light. Higher ISO numbers indicate higher sensitivity. Higher ISO numbers allow photography in low light level situations.
I have wanted to offer a primer in fossil photography for quite some time. Giving a program at a meeting was one avenue but not everyone may have an interest in this topic. There is also a lot to cover and a 45 minute program may only scratch the surface. I decided that I could more successfully cover the basics in a series of bulletin articles that will potentially see a wider audience.
I receive requests for identification help through our website and also in the "What is it?" Forum on myFossil.com. All too often, the images sent are blurry, too small, of low resolution, lacking a scale for size reference, strangely colored, incorrectly lighted, and either too dark or too light. Identification by photos is not always possible with good image quality but these issues make it altogether impossible.
With the advent of cell phone cameras, everyone is taking photographs - lots of them. The cameras in newer cell phones are getting better with each new introduction. With conversion of standard cameras to digital format and internal software that will let the camera decide the exposure, people can snap thousands of photos on vacation much more readily than was ever possible with film. From my viewpoint, this all means that people can now take more bad photographs much faster than before. We fortunately have Photoshop and can rescue a portion of these images with this powerful software.
What"s the problem here? Like many other fields, being able to afford the most expensive and latest cell phone or camera from Nikon or Canon does not make one a photographer. With the advent of auto this and auto that, few bother to learn the basics of photography. And that"s why I see so many poor fossil images.
My intent here is not to give a detailed lesson on photography. There are hundreds of books on that subject. I will discuss general topics to a level of detail that will be useful without being overly technical. Fossil photography of the small invertebrates we typically deal with is in the realm of macro photography or close-up work. There are specialty books devoted to this subject and I do recommend that you acquire and read at least one book on this subject.
Some may find this article to be over the top in detail. I apologize for that. I have always been detail oriented and having had a career as an engineer reinforced that. I did wedding photography for a few years and in that field, attention to detail is critical. That is also where I learned that not everyone has a critical eye when it comes to photographs.
As a further disclaimer, this document will contain many of my personal pet peeves. Some may think them to be unnecessarily picky. Others may discount some of my tips and techniques as needless. To these people I will point out that some individuals still collect fossils in cans while others have embraced the new technology of using bags for collecting (local Dry Dredgers will understand this reference).
To take acceptable photos of fossils you will need a cell phone with a good camera or a standard camera capable of taking very close photos. Cell phones can produce very good images although older phones have limitations. You will also need a sturdy means of support for whichever type of camera you choose. Let"s look at the options.
I confess that I have used my cell phone, a Motorola Droid Maxx a few years old, to take reasonably decent fossil photos when my DSLR wasn"t available. My son Kyle has a newer Samsung and he has taken amazing close-up photos of insects with it outdoors. So, it can be done. Add-on inexpensive close-up lens attachments are made for cell phones to allow very close focusing.
So, if you have a cell phone with a newer and better camera and it will take decent photos of fossils, why bother spending money on a DSLR? If you are satisfied with the images from a cell phone camera you certainly don"t need to invest in a DSLR. But, if you"d like photographs that are suitable for publication or enlargement and that are more impressive you"ll probably need the flexibility of a DSLR.
Cell phone limitations include: electronic zoom rather than optical zoom and low quality optics relative to DSLR lenses. This second item is very important. For example, a Nikon dedicated macro lens costs from $300.00 up to $900.00 by itself. How much do you think the lens in your $400.00 cell phone is worth? The difference in optical quality will be apparent in your final image, especially when it is enlarged to zoom in on detail. Clip on macro focusing lenses can be purchased for cell phones to allow closer focusing. A lens like this on the high end is around $30.00 - still a far cry from a DSLR macro lens.
Zooming in on your subject with a cell phone provides electronic zoom. This works the same way as enlarging or zooming in on a photo on your computer. On your computer you can enlarge to the point that the image is visibly degraded. You won"t easily see the reduction in resolution in a photo on the cell phone screen but it is there none the less. Optical zooming with a DSLR lens will enlarge the image without degrading the resolution. Optical versus electronic zoom is a specification you should note on inexpensive point and shoot cameras as well. Better cameras will have optical zoom. How can you tell if your camera has optical or electronic zoom short of reading the specifications? If the lens physically moves in and out when you zoom it is optical zoom.
Originally I had a much longer list of cell phone limitations. After doing some fact checking with my son Kyle, the list dwindled. Accessories are now available to allow cell phones to be mounted to a rigid mount. Remote blue tooth features can trigger the shutter. Higher end cell phones have the ability to adjust to different light sources, set the ISO sensitivity (see later section on light) and set the aperture (f-stop). Some lower end phones also have this capability but the manufacturer has that feature locked out. These can be unlocked by the tech savvy person with an app after the phone has been "rooted." Not a process for the average person.
Most DSLR cameras can be purchased bundled with lenses and other accessories. Many times, at least one lens in a package is a macro focusing zoom lens that can be used as an entry into the realm of macro photography. These lenses will focus closer than a lens without this macro capability but they lack the range of focus that a dedicated macro lens will provide. A true macro lens will produce a 1:1 magnification on the camera"s sensing screen. This 1:1 ratio means that the measured size of the image on the sensor is exactly the same as the measured size of the object. For a 35mm camera with a sensor size of 24mm x 36 mm, an image of a 12mm enrolled trilobite will half fill the frame at a 1:1 magnification ratio.
Focal length of the macro lens is important when working with very small objects that require the closest settings. My first macro lens had a 60mm focal length and I realized quickly that this was a problem when photographing very small objects. The camera and lens had to be so close to the object being photographed that it was difficult to properly arrange the light source as the lens was in the way. I now use a 105mm macro that allows the camera and lens to be almost twice as far away from the specimen. This problem of being in the way of the light source will also be apparent when using a cell phone on an extreme close-up.
Note that because of the physics of lens design and optics, macro lenses work best with flat objects. Their depth of field is minimal (see later section). Our fossils are three dimensional so set-up is critical to minimize this issue.
Megapixel Ratings
All newer cameras and cell phones have increasingly larger Megapixel ratings that improve image quality over older models. However, that rating isn"t going to compensate for optics of lesser quality or images that are not in focus.
At the relatively small size we print or view our photographs, a huge megapixel rating may not be apparent. Those large megapixel ratings like the 45.7 for the new Nikon I mentioned above allow the photograph to be enlarged to gigantic sizes without degradation of the image. This is a plus for professional photographers. Unless you are printing your photos as posters or wall sized images, you really don"t need to have super large Megapixel ratings.
In order to produce a good macro image the camera or cell phone needs to be attached to a substantially rigid mount. Hand holding your camera or phone will show the slightest movement of your hands in the final image.

 Tripods
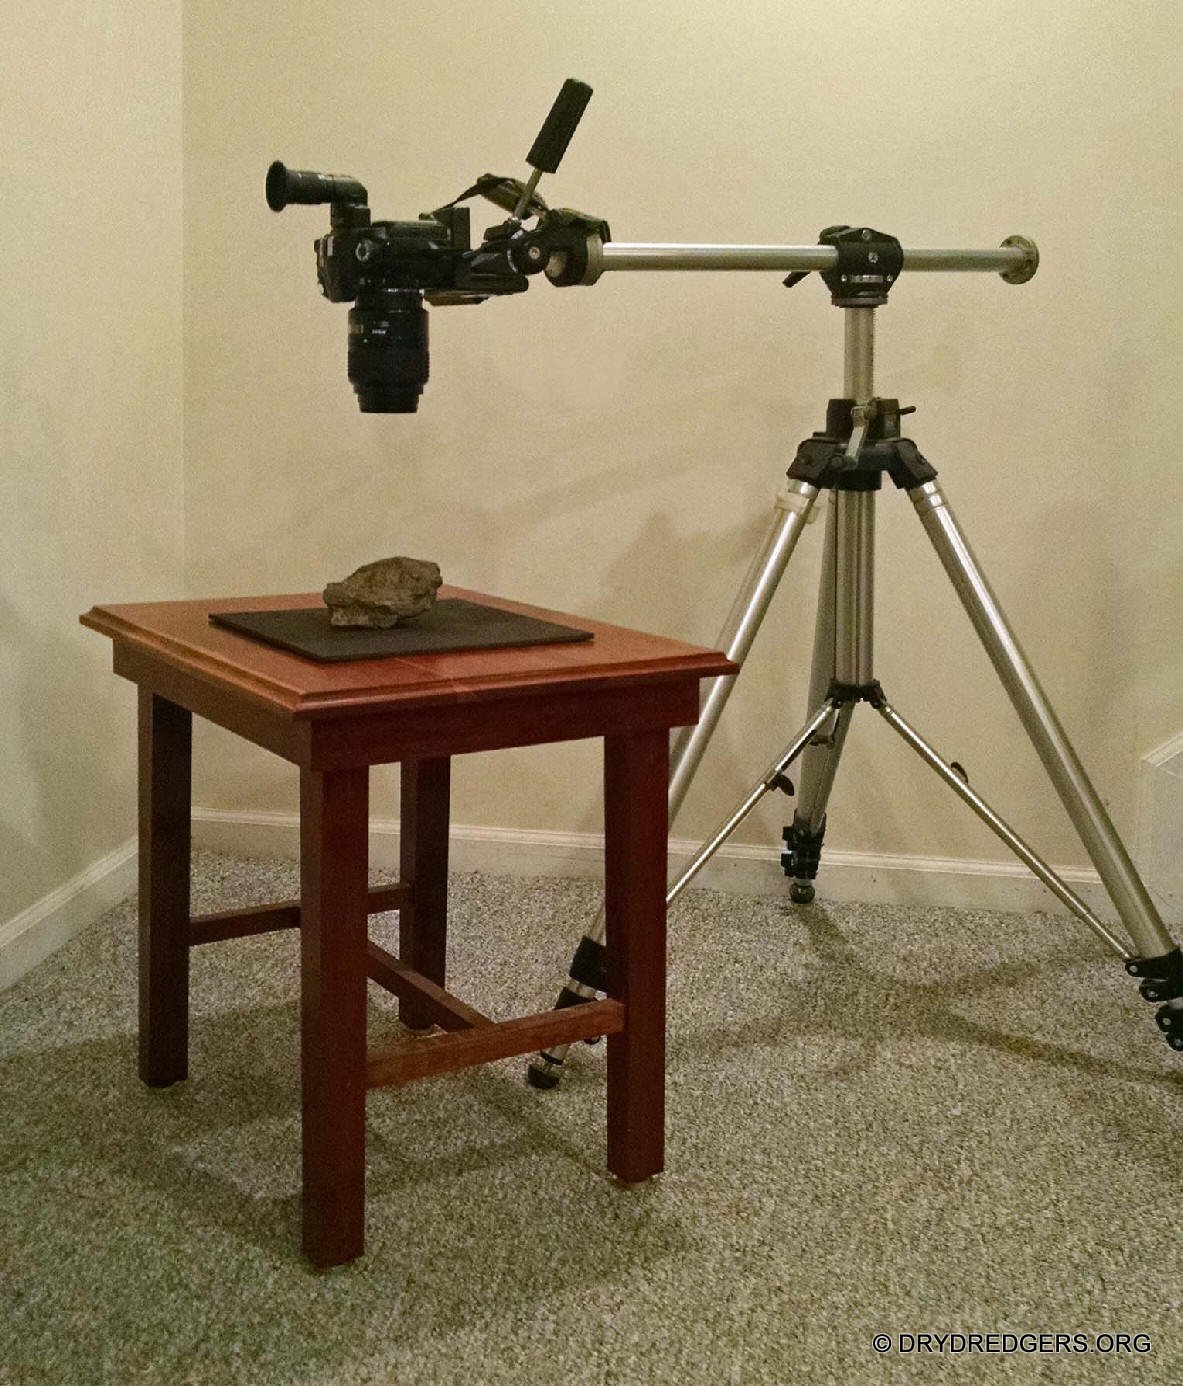
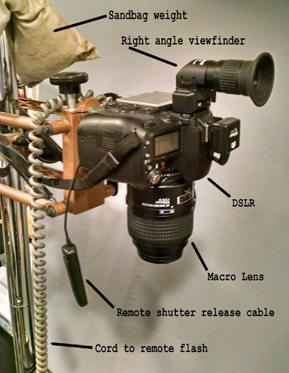
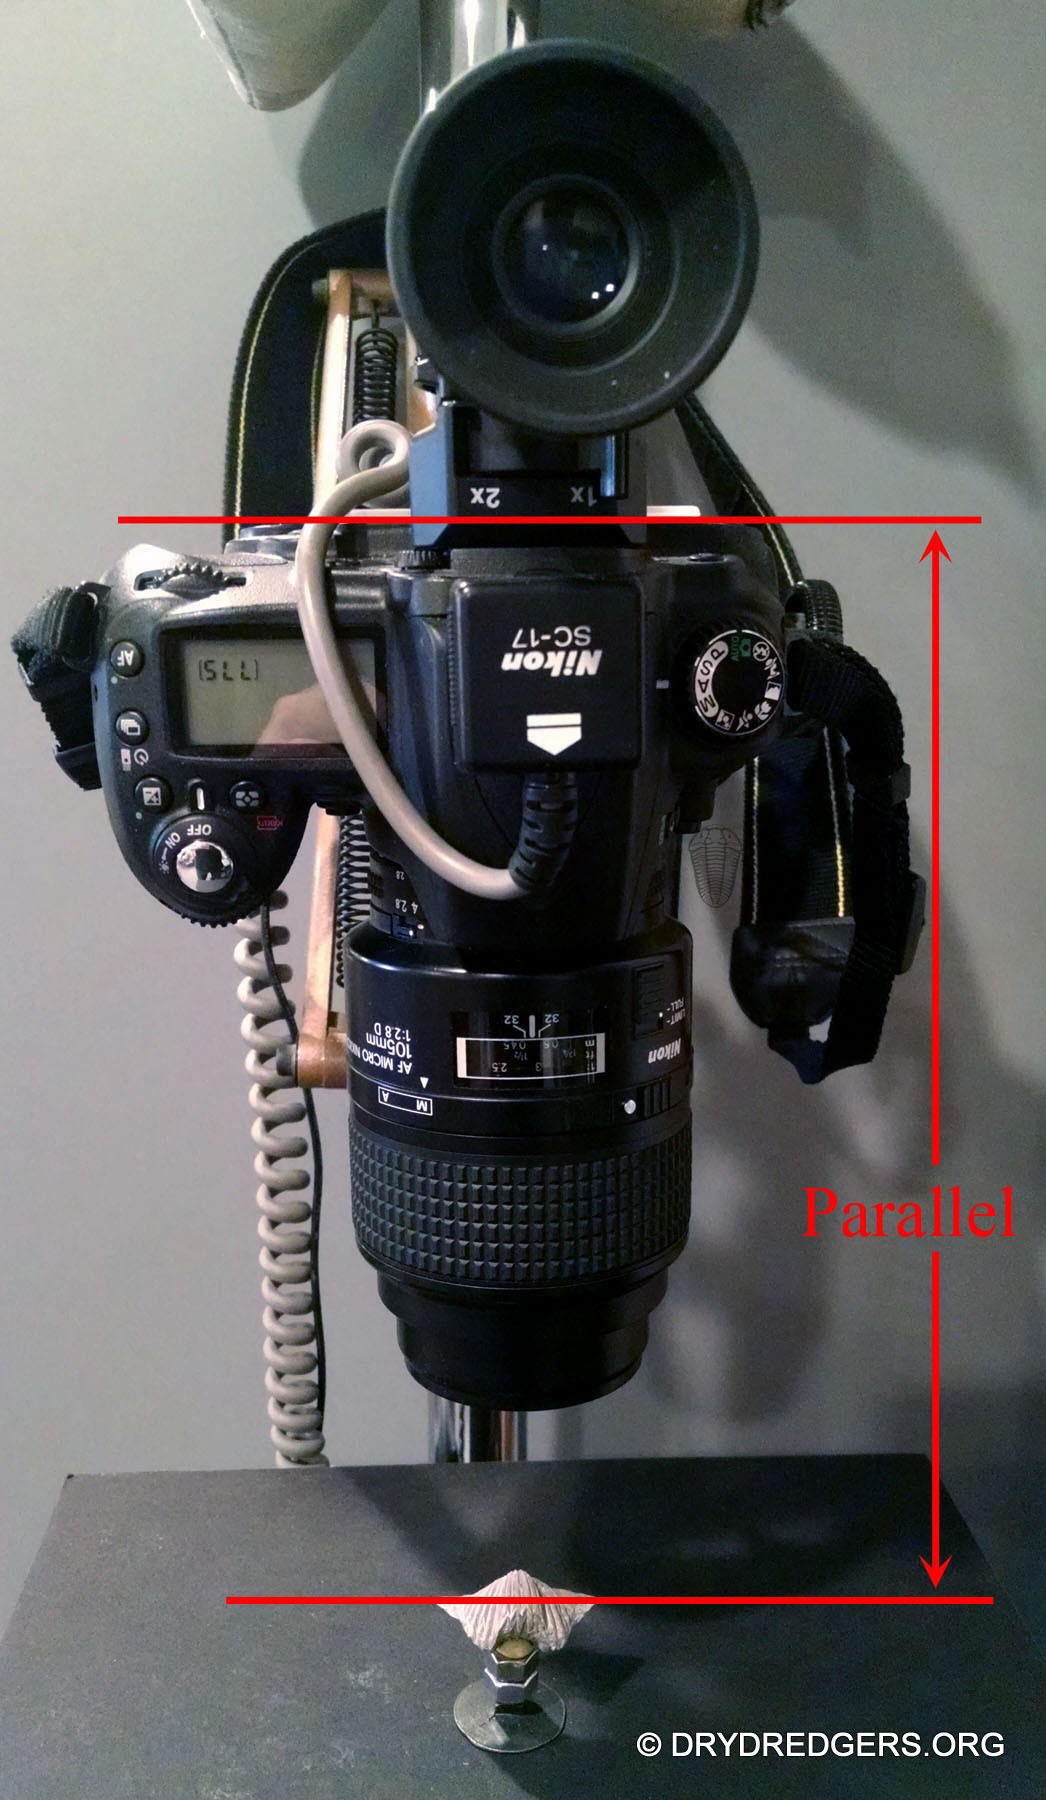
A tripod can be used as a means of supporting the camera. Most low cost tripods are, frankly, not all that stable for this type of photography and benefit from adding weight to dampen vibration. Any kind of weight can be used from sandbags to heavy objects tied to the stand. The few cell phone tripods I have seen would certainly not be described as substantial. It is an advantage to be able to aim the camera straight down on your subject letting gravity help stabilize your specimen. Some of the better tripods have an outrigger accessory that will allow for this arrangement as shown in the photo to the right.
A more flexible apparatus for macro photography is a copy stand. These consist of a flat base with a column that holds the adjustable camera mount. Really good stands are very expensive but cheaper ones can be used as well. This latter method is what I use with added weight on the column and base for vibration dampening. My basic set-up is shown at the right. The black boxes under the specimen contain lead shot. The bag on the top of the column is filled with sand.
 Light
LightAll forms of photography depend on proper lighting. As a matter of fact, all photography deals with the manipulation of light to create an image. A photographer must control the light source and its intensity. In nature photography this many times means waiting for the light to be a certain way - sun rise, sun set, cloudy or bright. Even outdoor photographers use flash or reflectors to modify the lighting. In a studio setting, the photographer controls the lighting in whatever way he chooses. As collectors, we oftentimes photograph fossils in the field and have to deal with whatever lighting we have. I won"t discuss this aspect as field photos serve a different purpose than the more formal photos I am discussing here.
Any number of light sources can be used for fossil photography. One can set up for taking photos outdoors using the sun as a source - but see the topic concerning direction of light. Indoor lighting can be incandescent lights including halogen, LED lights, fluorescent lights or flash. When looking at an object with your eyes, all of these light sources will appear to show you the correct color of the object. Cameras, including cell phone cameras do not see them the same way and thus produce false color images if not properly compensated. Incandescent lights including halogen lights produce warm images with an orange color cast. Fluorescent lights tend to produce a green color cast. Any cool light source will produce a blue cast. Camera flash is close to daylight and will produce the closest to the actual color of the object. DSLR cameras and some cell phone cameras have settings for the various light sources that can be set prior to taking any photos. This is referred to as the white balance setting.
The amount of light that you have available for capturing your image has a marked impact on the final result. Whether you have a very bright light source or a dimmer source, a DSLR or cell phone camera can be adjusted to produce a properly exposed image. Cameras set to auto exposure will automatically make the necessary adjustments to compensate for the intensity of the light. You may not like the results however. Typically, the camera adjusts the sensitivity of the sensor in the camera (a higher ISO number) to make it more sensitive in dim situations or it activates the flash. Alternatively, the camera may change the lens opening or shutter speed. Without a flash to increase the available light, the image produced can be grainy and low resolution. In my situation I use a dedicated flash. The flash has its own internal processor that communicates with the one in the camera so that between the two of them, the exposure is controlled automatically. Auto exposure control with the dedicated flash is the only automatic feature I use.
While a dedicated flash connected to the camera may be ideal, equally good results can be had by using a non-dedicated flash. The downside is that you will need to know a lot more about photography and lighting to be successful. This is the way I first did all of my fossil photographs using two identical flash units with one for the main light and one for fill (see explanation of fill lighting below). Positioning the flash units in relation to the specimen was based upon the magnification ratio being used. I also had to bracket the exposure with three different settings (three photographs at slightly different camera settings).
A DSLR and some cell phone cameras can be adjusted for light sensitivity by the user. This sensitivity is set by choosing an ISO number (this number relates to the speed or light sensitivity of the camera sensor). Ideally, an ISO setting of 100 tends to work well for fossil photography. A low number, like 100, indicates that the sensor is less sensitive to light than a higher number, such as 400 or above. A lower number will produce a higher resolution image but requires that more light be provided from your chosen source. In a given situation, with insufficient lighting, one fix is to set the camera ISO to a higher number to increase the camera"s sensitivity to light. The big downside to this is image degradation that will be very apparent.
Shutter speed is another setting that is used to manipulate the amount of light to expose the image. Independent control of this in cell phones may be available as a tech fix. DSLRs are completely adjustable in this regard. When using flash as I do, this becomes a fixed setting as the camera and flash have to be synchronized to a specific shutter speed. Shutter speed adjustment is necessary when using fixed lighting (not flash) since the lens opening (f-stop) will need to be set for depth of field control (see next month"s photography installment). This leaves shutter speed as your only other means of exposure control. In a low light situation the camera will, in essence, be taking a time exposure of noticeable duration.
The standard convention for the direction of light for fossil photos places the light source at the upper left and about 45 degrees above the object. Shadows produced will be cast down and to the right. Any light source that can be situated in this position will work. If using flash, the connection to the camera will need to be through a dedicated flash cord to position the flash off camera. On-camera flash will not work for a number of reasons. The camera is too close to the object, putting the light from the flash off center from the specimen. A light source that is directed straight down on your fossil produces flat lighting, i.e., lighting that eliminates shadows and obscures surface texture. The fossils we photograph are three dimensional objects with surface texture. Being able to see the surface features makes the fossil look more real and makes it easier to identify. Specialty ring light flashes and balanced twin flashes are used in macro photography specifically for flat lighting but typically not when surface texture must be seen.
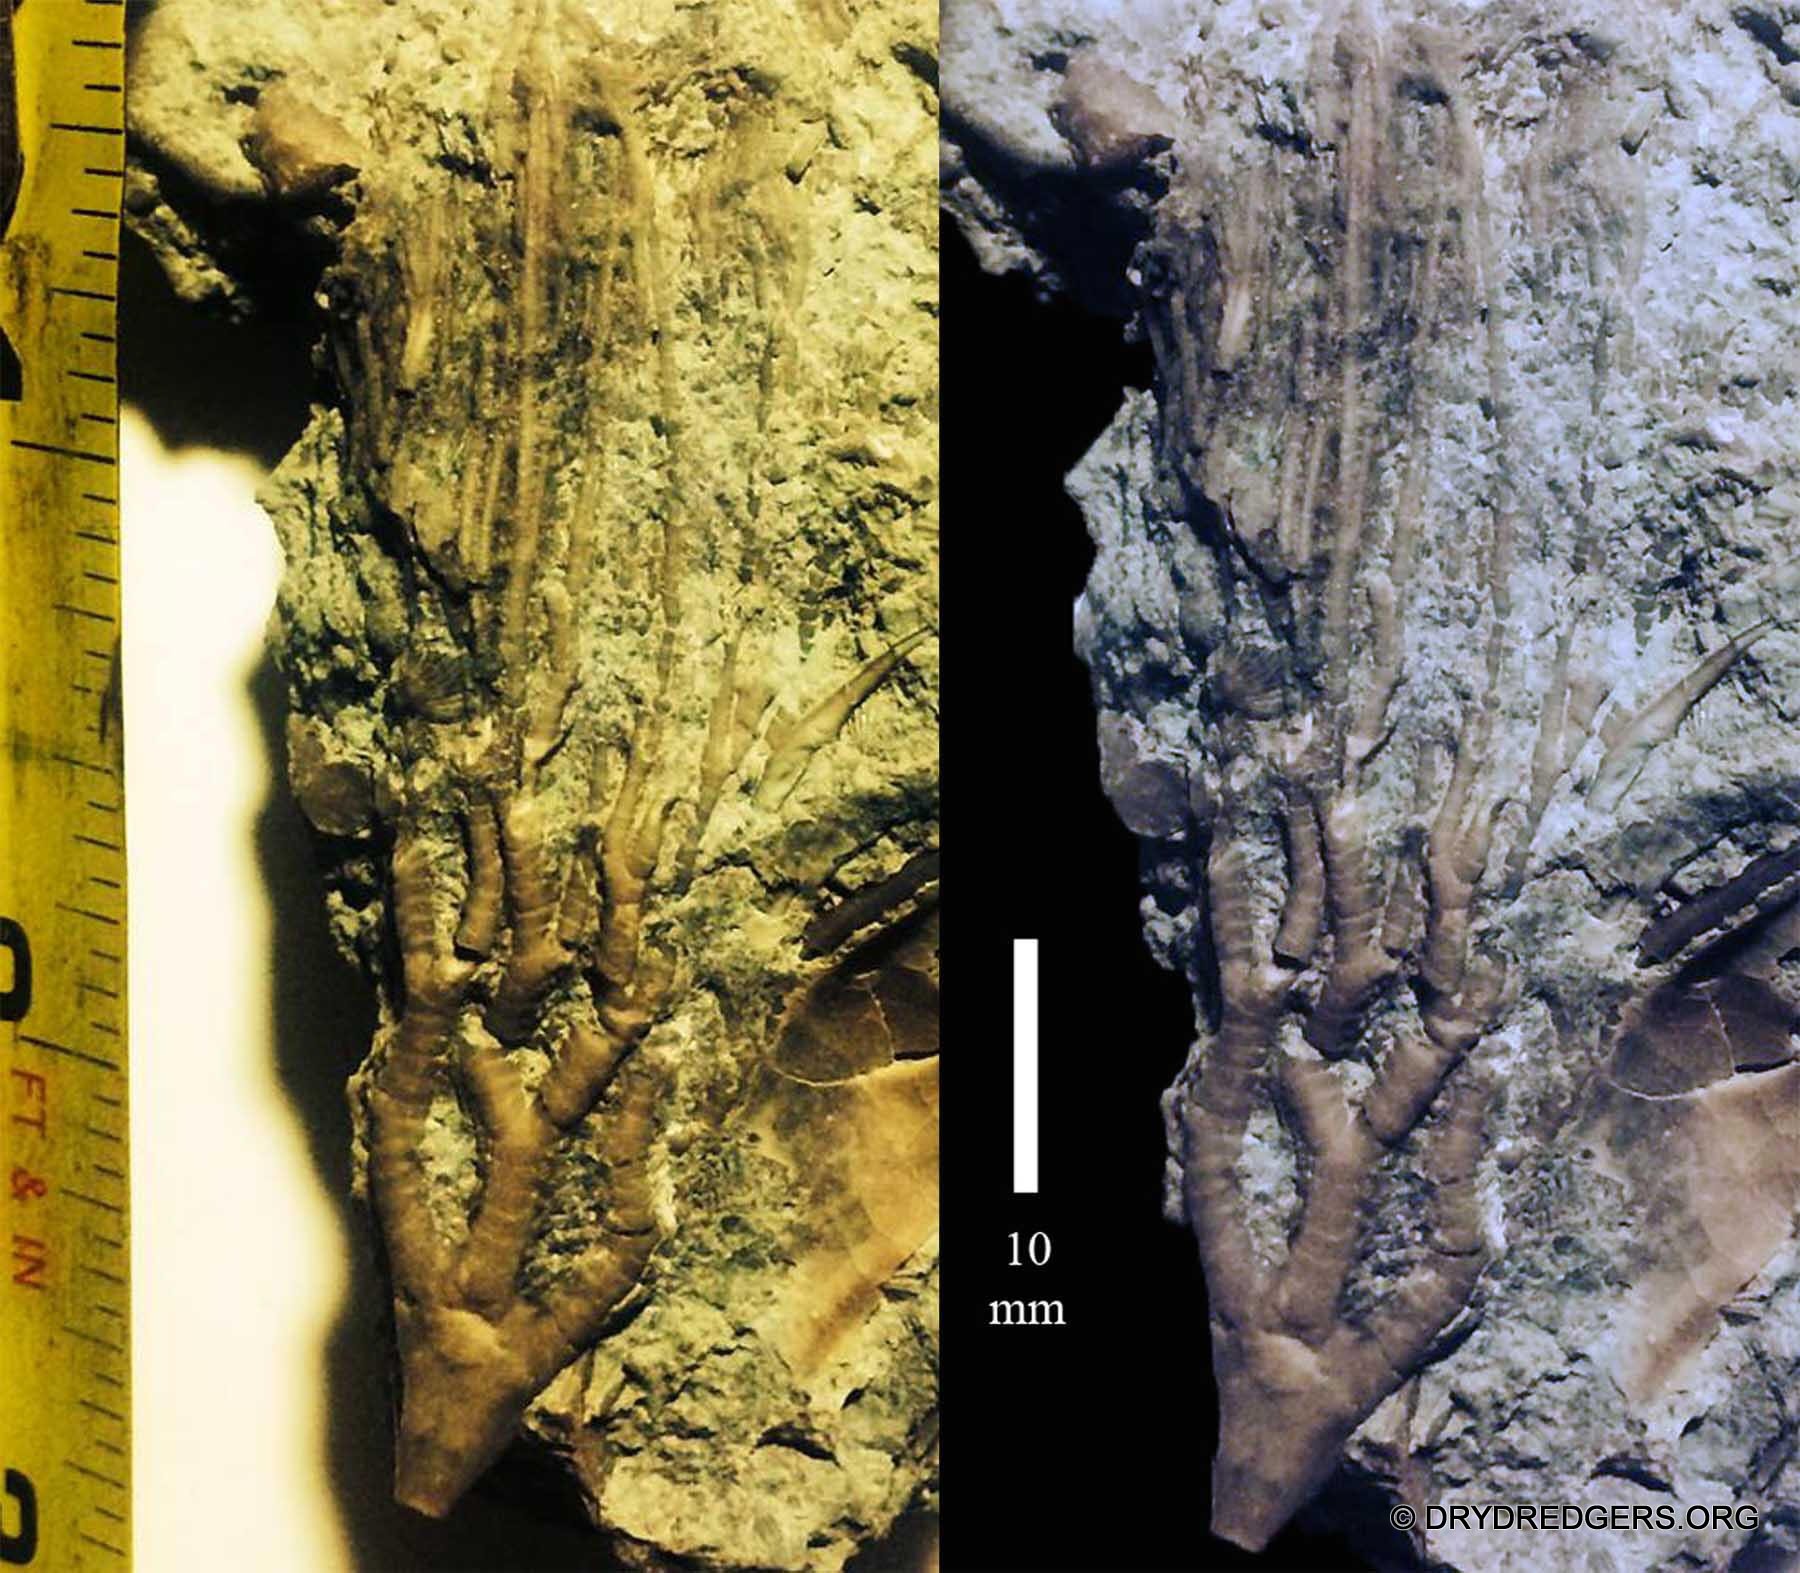
Trace fossil photography is a special case for lighting direction. Generally there is little if any contrast between the trace fossil and the matrix on which it resides. The only way to make an acceptable image of a trace fossil is with strong side lighting. While the light source still needs to be located to the upper left of the fossil, it must now be lowered to 10, 20 or 30 degrees above the object. Multiple exposures at different lighting angles are usually needed to determine the best set-up. This should make perfect sense to trace fossil collectors. They are well aware that early morning and late afternoon are best for finding trace fossils when the sun is low in the sky and casting long shadows.
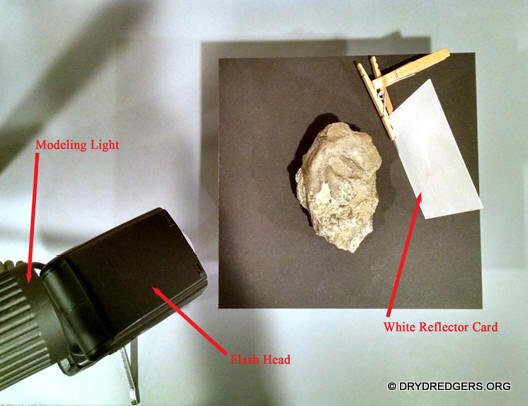
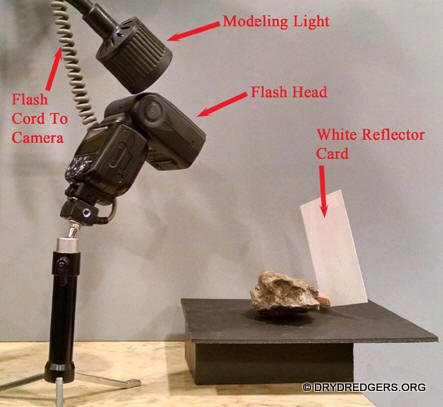
A single light source will produce fairly good images of your fossils. Sometimes though the shadows produced by a single light source can be too strong. A more balanced image can be had by reducing the intensity of shadows by way of adding a second, although weaker, fill light opposite from the main light. This can be done with a second identical light placed farther away from the specimen off to the right or lower right. I use a single dedicated flash when taking my fossil photos. To provide balance I use a white card as a reflector to fill in the shadows. The flash bounces off of the white card back into the shadows to soften them. Moving the card closer or farther away changes the intensity of the effect. The object is not to eliminate the shadows, only to soften them. If you are doing this with a cell phone or other non-DSLR camera you"ll just have to experiment until you get things the way you want them. With a DSLR you can manipulate the lights or reflector while looking through the viewfinder to verify that the main and fill lighting are producing the desired effect. This works well with fixed lighting but, when using flash as I do, there is no light on the specimen with which to judge the set-up. The addition of a modeling light takes care of this issue. I use a halogen work light for this purpose positioned next to the flash so that it produces the same shadow effect as the flash would. The modeling light is only on during set-up (for focusing and lighting adjustments) but not when the final exposure is made with the flash.
Manipulation of shadows and highlights is another process that can be done in Photoshop to a certain degree. If the shadows are so intensely black that there is no image data in the shadows, even Photoshop will not be able to improve the image. The same is true for areas with over exposed highlights with image data burned out in the brighter areas.
I can"t tell you how many photos I have seen with blurry images from people asking for ID help. Blurry images can be caused by improper focusing to begin with, trying to make the image larger by moving the camera closer to the specimen beyond the focusing capabilities of the lens, or by camera shake from taking the photo without bracing the camera. The bottom line is that if the image is blurry to your eye, it will be blurry to everyone else as well and useless. Remember that a small sharp image is better than a large fuzzy one.
Regardless of the equipment, be it cell phone or DSLR, there are limits to how close you can get to an object and still achieve focus. Know what the limitations are for your equipment. Remember WYSIWYG? What you see is what you get applies here. If an image is blurry in the viewfinder or on the viewing screen of your cell phone don"t bother taking the picture.
A useful but not absolutely necessary accessory for a DSLR camera is a magnifying eyepiece. I have one on my camera and use it all the time for its right angle viewing feature. For critical focusing I can flip a switch and it becomes a 2X magnifier allowing for more critical focus.
Cell phones use auto focus and even DSLRs have that capability. The main issue with auto focus systems is that the camera has no idea what you want it to focus on. Most DSLRs and cell phone cameras have selectable programs that allow you to tell the camera whether you are shooting portraits, scenic views or close-ups. Close-up would be the program of choice for fossils that would have the best chance of producing acceptable images. With the full control of a DSLR you can choose the point of focus to achieve the best image. In my situation, I place the camera in manual focus mode and set the camera program to aperture priority. This keeps my lens opening fixed at an optimal setting for the best depth of field (see next section below).
 I
am covering depth of field here as it relates to focusing on an object. Because
of the physics of optics, lenses have a specific focal point, i.e., a point at a
distance from the camera where everything is exactly in focus. Because of lens
design and the resolving capabilities of your eyes, there is an area in front of
and behind this focus point that has acceptable focus. The distance between
these two points is called the depth of field. With general purpose lenses, this
distance is larger than with a dedicated macro lens. Macro lenses have very
small depth of field dimensions which can make photographing small three
dimensional objects challenging. When you photograph a person standing outside
you probably have a depth of field measured in feet in front of and behind your
subject. Depth of field for macro photography is measured in millimeters.
Knowing what controls depth of field is one of the more important principles of
photography. Two settings affect the depth of field: the distance from the
subject and the size of the lens opening (called the f-stop). Photographers
manipulate these settings to achieve their desired effect while maintaining
proper exposure.
I
am covering depth of field here as it relates to focusing on an object. Because
of the physics of optics, lenses have a specific focal point, i.e., a point at a
distance from the camera where everything is exactly in focus. Because of lens
design and the resolving capabilities of your eyes, there is an area in front of
and behind this focus point that has acceptable focus. The distance between
these two points is called the depth of field. With general purpose lenses, this
distance is larger than with a dedicated macro lens. Macro lenses have very
small depth of field dimensions which can make photographing small three
dimensional objects challenging. When you photograph a person standing outside
you probably have a depth of field measured in feet in front of and behind your
subject. Depth of field for macro photography is measured in millimeters.
Knowing what controls depth of field is one of the more important principles of
photography. Two settings affect the depth of field: the distance from the
subject and the size of the lens opening (called the f-stop). Photographers
manipulate these settings to achieve their desired effect while maintaining
proper exposure.
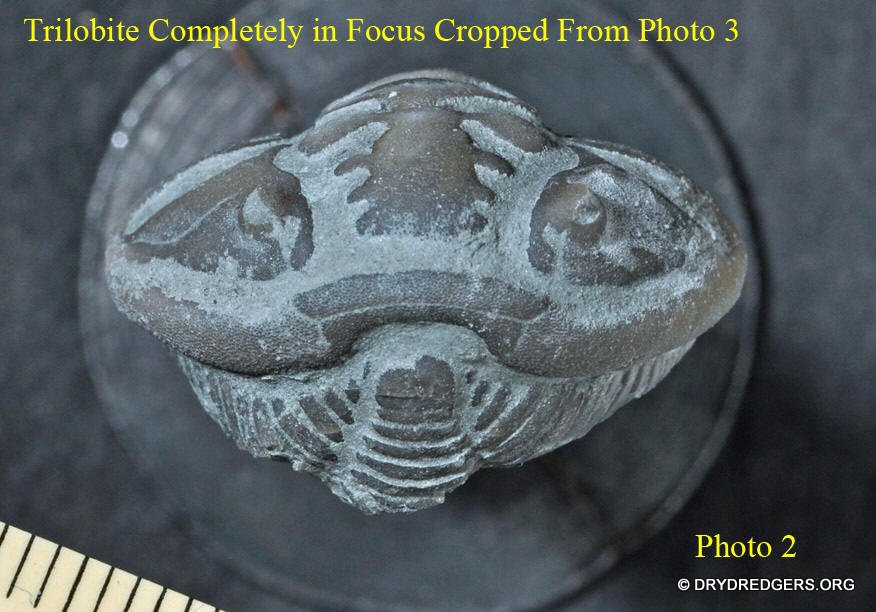
Because invertebrate fossils can be small, the camera is usually very close to the specimen in order to get a frame filling image. This presents a shallow depth of field. If the specimen is relatively flat, depth of field issues may be minimal. Photographing a very thick brachiopod like Platystrophia ponderosa or an enrolled trilobite will become a problem in that parts of the image will be sharply focused and parts will be out of focus. Compare photos #1 and #2 below. Photo #1 is a full frame shot with the camera as close as possible to fill the frame with the trilobite. Photo #2 is cropped to size from photo #3 that was taken with the camera farther away.

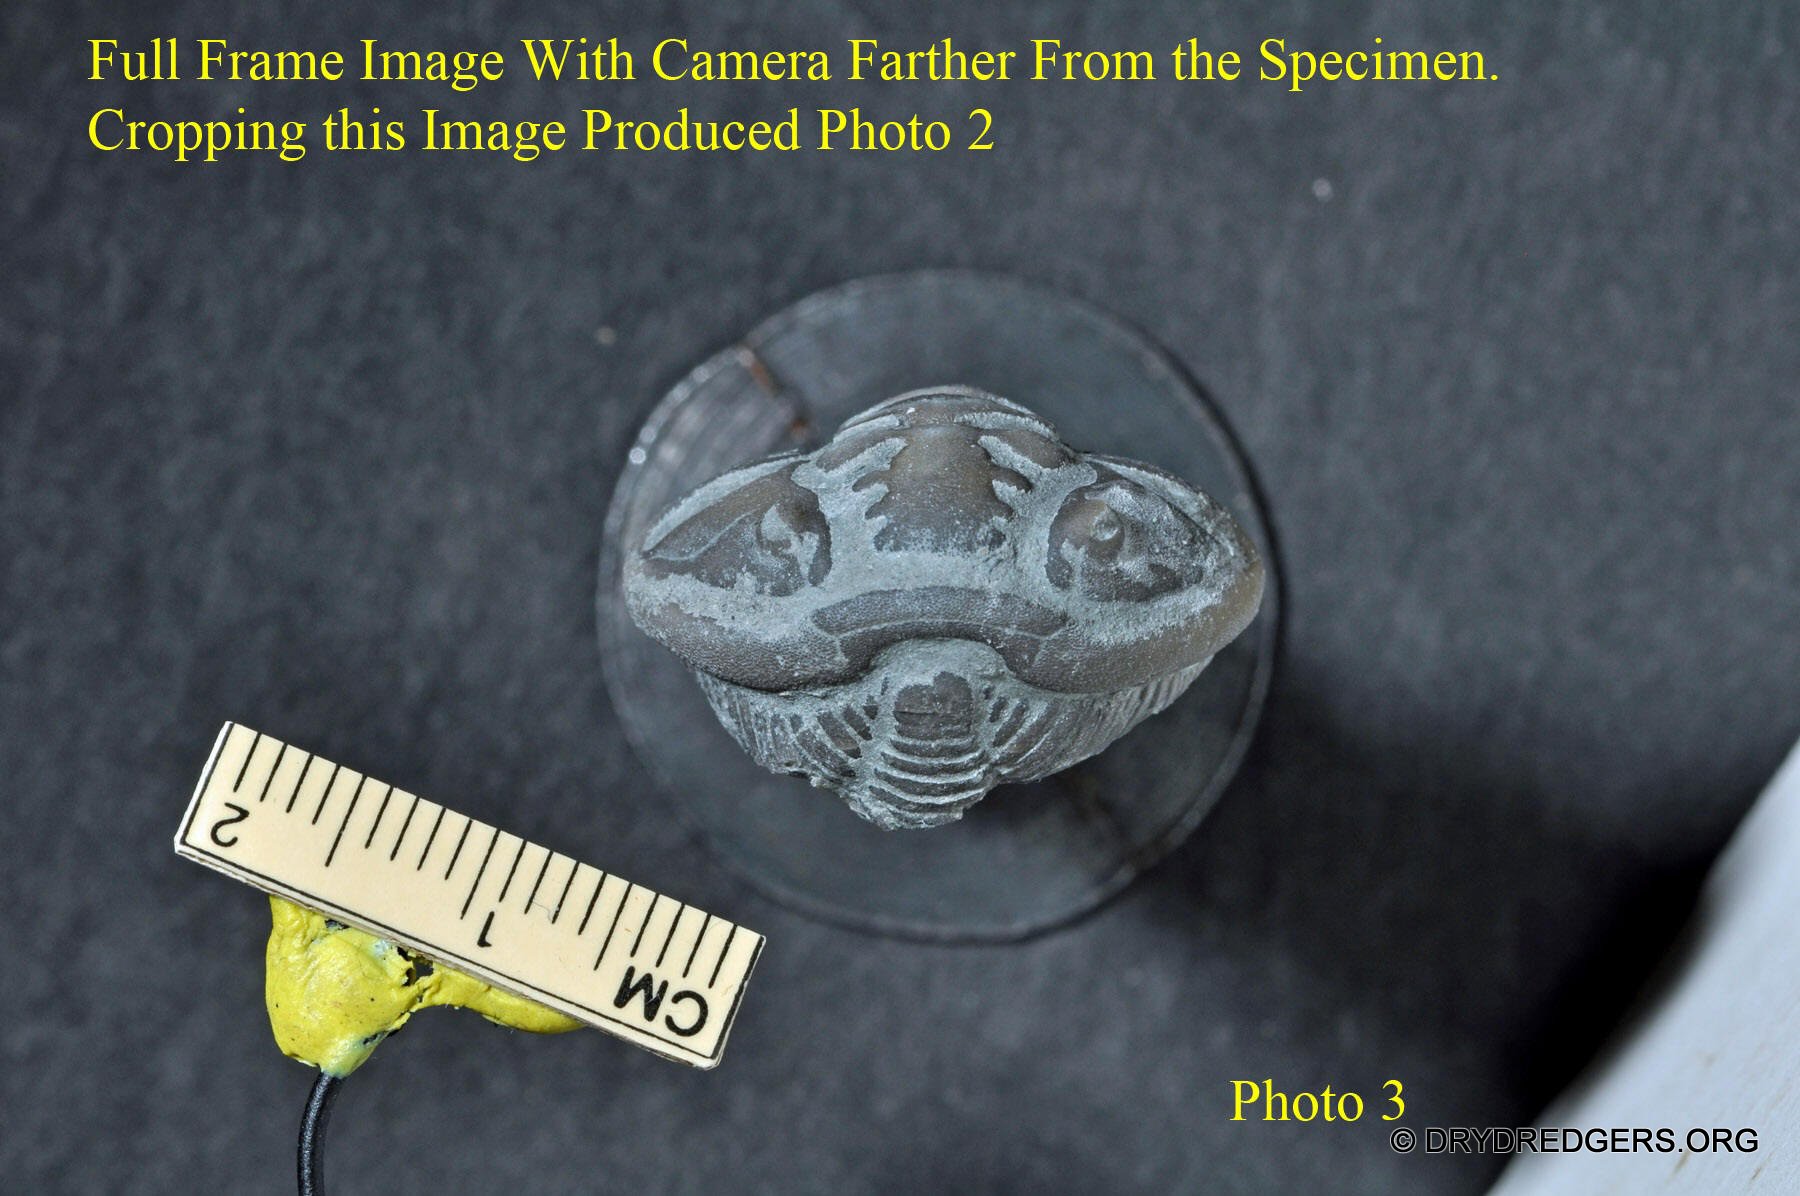 |
Depth of field rule number one - To increase depth of field move the camera farther away from the specimen. This produces a smaller image in the frame that can be cropped for size later but it will increase the depth of field. |
Lens Opening
|
|
An advanced technique for eliminating depth of field issues is called focus stacking. Focus stacking requires additional equipment and computer software. With this technique, the camera is mounted to a special stage that can be moved in precise increments. The camera is positioned and focused on the closest part of the specimen and an exposure is taken. The focus adjustment on the camera is kept fixed but the camera itself is moved forward a fraction of a millimeter and a second exposure is taken. The camera is incremented again and again in this manner until the final exposure at the farthest part of the specimen is taken. The result is a series of images possibly numbering into the hundreds, each with a tiny bit of the specimen in perfect focus. These images are input to the computer software that then combines all of the perfectly focused portions of each image into one final image with everything in focus throughout the specimen. The results are impressive.
For the best possible image the photographer must eliminate any camera shake or vibration as this will blur the image during exposure. When a tripod is not available, the best you can do is brace the phone or your hand against something solid and control your breathing. This technique works with any camera when a tripod can"t be used.
DSLR cameras produce their own vibrations when the mirror opens and closes and the shutter leaves move. For the best results when using a DSLR, the camera should be mounted on a tripod or copy stand. High quality rigid copy stands are perfect but very expensive. I use a less expensive model and use bags of lead shot on the column and base. This extra weight dampens vibration. It is also necessary to use a remote cable release rather than the shutter button on the camera to take the picture. Another feature that DSLR cameras have is a means to lock up the mirror before taking the exposure to stop this source of shake.
Special tripods are now available for cell phones to help avoid camera shake. These tripods are not especially robust compared to those for DSLR cameras but their use will be a big improvement over a hand held photo. Remote triggering devices using Blue Tooth are available as well.
The type of background selected for fossil photography is an important one. Backgrounds come into play when the specimen does not fill the frame of the photograph. Distracting or textured backgrounds should be avoided.
Background rule number one - Use a smooth solid color background. Backgrounds with texture or color patterns distract from the fossil. Even a simple piece of cloth has noticeable texture when magnified through a close up photograph. Undesirable backgrounds can be removed in Photoshop fairly easily if the original background is a solid color. Textures and patterns make it difficult for Photoshop (and your eye) to decide what is fossil and what is background. Be aware that auto focus systems seem to like focusing on the background texture rather than the specimen. Foam core is my background of choice as it is smooth and one color.
Background rule number two - Use a neutral color for the background such as black, white or medium gray. Backgrounds of other colors can reflect that color on to the edges of the fossil. This kind of reflected color can sometimes be removed in Photoshop but not always. If, after taking a photograph with a neutral background you still desire a different color, this can easily be done with Photoshop.
You all should know by now that my background color of choice is black. A pure black background is used by photographers to make an image "pop" off the background. It produces the most dramatic effect. A pure shadow-less black background is the only background color that can be achieved without using Photoshop or very elaborate lighting set-ups (See the section on making a black background for instructions). I rarely use this set-up myself anymore since I use Photoshop to create the pure black background today. Note that a white background is required for publication in some journals.
My set-up for all small fossils is to position the fossil on a piece of black foam core material. A white or gray foam core would also work. When photographing a specimen laying on a flat support in this manner, your properly positioned light source will cast a visible shadow on the background that will be seen in the final image (even on the black foam core).
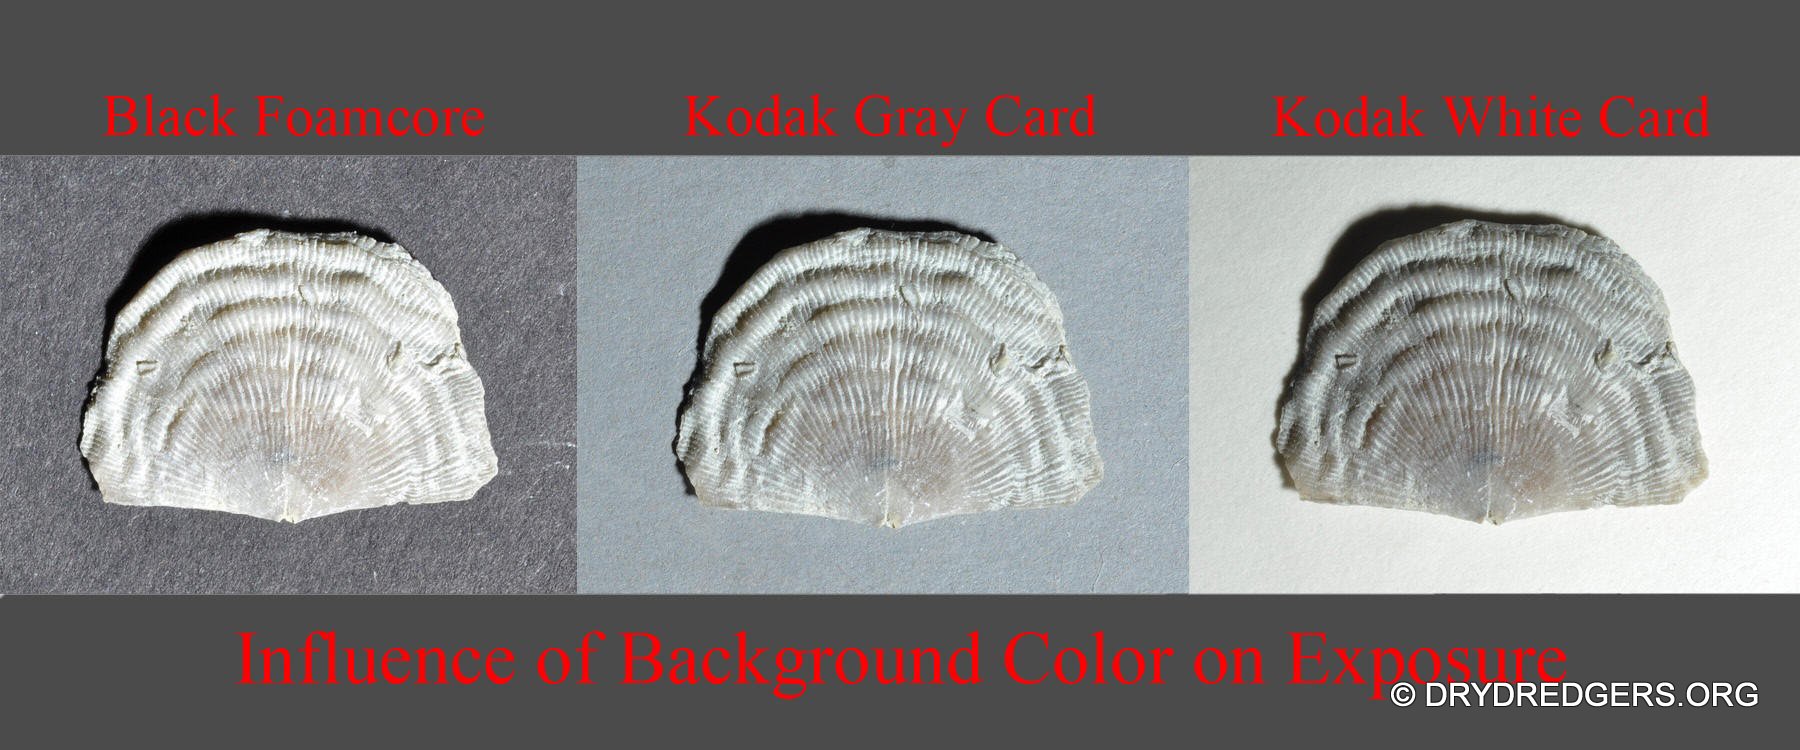
You should also be aware that using black, white or gray backgrounds can affect your exposure. The light metering algorithms in cameras attempt to set the exposure to make the entire image (not just your subject) as if it were taking a photo of a medium gray scene. When using a black background, the camera will overexpose the background and your specimen trying to achieve this (trying to brighten the black into gray). With a white background just the opposite occurs as the camera underexposes the white and your specimen (trying to darken the white into gray). A medium gray background will produce little if any adverse exposure problems. So, if you use white or black backgrounds you need to be aware of this and manually set the camera to over or underexpose as needed. The amount of compensation varies depending on how much background is visible relative to the specimen. Both DSLR and cell phone cameras can be adjusted to compensate for the background to correct the exposure - just be sure to make the adjustment based on the specimen exposure not the background.
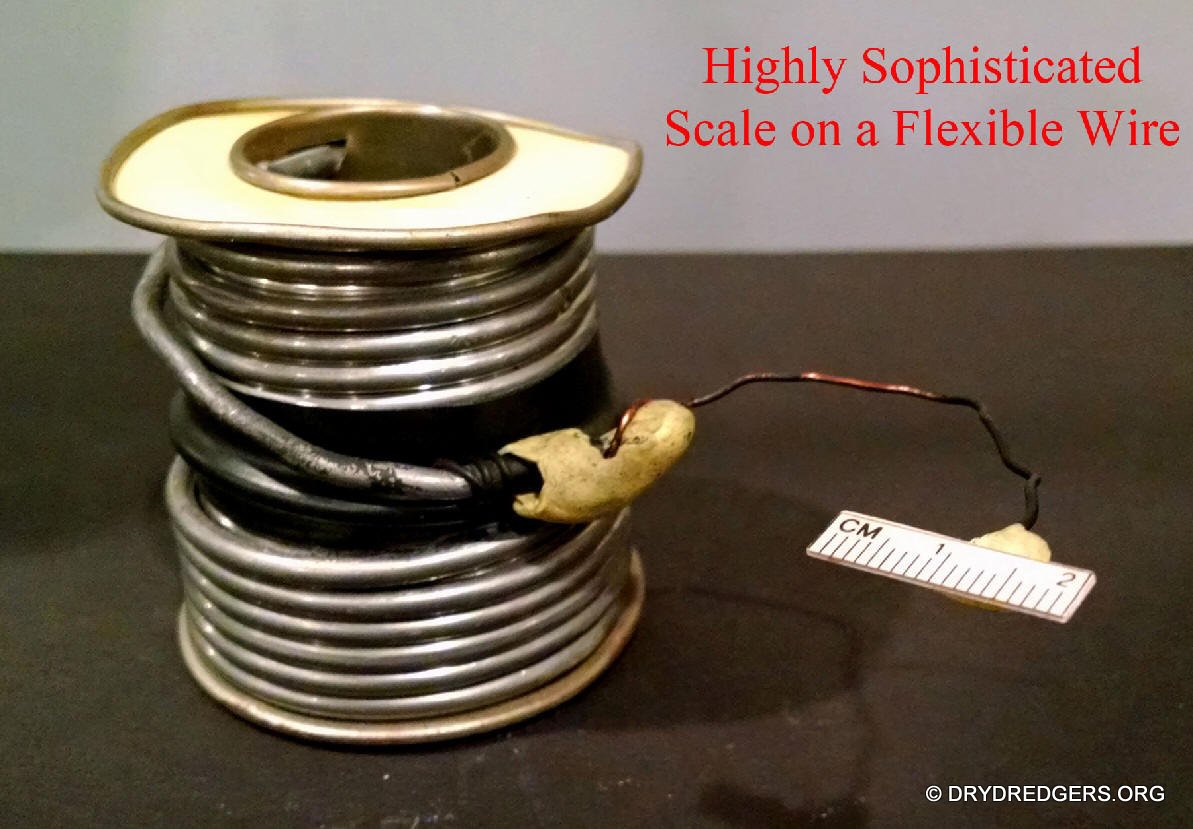 A
very important aspect of fossil photography is being able to convey the size of
the specimen to the person viewing your photo. You need a scale in your photo. I
see coins and camera lens caps used for this purpose because it is convenient
and easy for the photographer. Coins and lens caps are marginally acceptable in
my opinion because they only show relative size. If the viewer doesn"t know the
actual size of the coin or lens cap even that relative size is questionable. Do
you happen to know the actual size of a one Euro coin or a Chinese Yuan? I have
a Euro in my coin collection but I"d still have to dig it out and measure it to
get an exact number. And was that lens cap a 50mm or an 85mm cap? You need a
real scale. You can use an actual ruler, preferably metric for its universality,
or one of the GSA scales with the metric bars. A scale bar can be inserted into
the final image using Photoshop too as long as you know the size of the
specimen.
A
very important aspect of fossil photography is being able to convey the size of
the specimen to the person viewing your photo. You need a scale in your photo. I
see coins and camera lens caps used for this purpose because it is convenient
and easy for the photographer. Coins and lens caps are marginally acceptable in
my opinion because they only show relative size. If the viewer doesn"t know the
actual size of the coin or lens cap even that relative size is questionable. Do
you happen to know the actual size of a one Euro coin or a Chinese Yuan? I have
a Euro in my coin collection but I"d still have to dig it out and measure it to
get an exact number. And was that lens cap a 50mm or an 85mm cap? You need a
real scale. You can use an actual ruler, preferably metric for its universality,
or one of the GSA scales with the metric bars. A scale bar can be inserted into
the final image using Photoshop too as long as you know the size of the
specimen.

In previous tutorials I mention proper exposure and adjusting exposure settings based upon the background being used. I always take at least two photographs of each specimen at different exposure settings. I pick the best one once I open the image on the computer. I generally choose the image that is darker or slightly underexposed to work with even though I may need to brighten it up in Photoshop. I do it this way because a brighter image, especially an overexposed one, has actually lost image data in the highlight areas. You can take an overexposed image and darken it to make it look better but the bright areas will be missing image data. Conversely, a slightly underexposed image has all of the image data and details of your specimen and it can be brightened without loss and will result in a better finished photo.
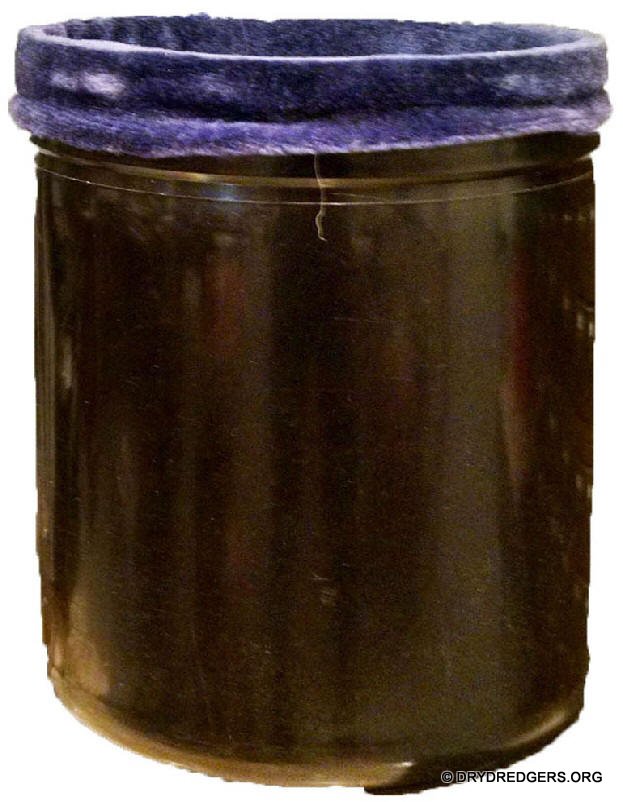
Creating a pure black background without PhotoshopA pure black shadow-less background is the only solid color background that can be produced without an elaborate lighting set-up. Any other color will require multiple light sources and a glass platform for mounting your specimen. The set-up I have used for years is based upon descriptions presented to the Dry Dredgers many years ago in a lecture by Professor Richard Davis. In order to use this technique, the camera will need to be mounted on a tripod or copy stand so that it points straight down. Here is what you will need:
1) Construct
or obtain an open top container that is taller than wide. This can be
cylindrical or rectangular. I use a film can that is 7 inches in diameter
and 10 inches tall. The interior of this container can be painted flat black
or lined with black fabric material. Neither of these interiors is
completely non-reflective but they serve the purpose.
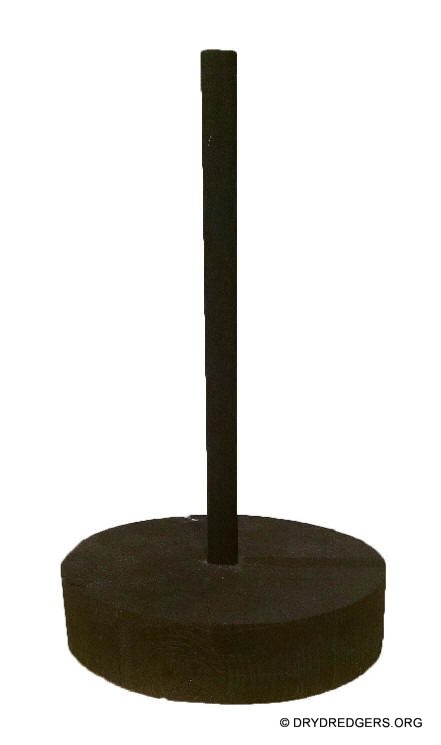
2) Fabricate a small base with a vertical post such that when placed inside
the container, the top of the post is even with the top of the container.
The base and post need to be painted flat black. I made a wooden base with
multiple holes drilled in it that accepts posts of different diameters
(larger diameter posts for bigger specimens). The posts that I use are brass
tubes purchased at a hobby shop.
3) Purchase a non-oil based putty for temporarily positioning and securing
the specimen to be photographed on top of the post. Be sure what you use is
removable, reusable and will not leave a residue (modeling clay is not
acceptable). The putty I use came from Hobby Lobby.
4) Position the specimen on the top of the post and adjust to get the
desired composition. The diameter of the post needs to be smaller than the
specimen so that the post does not show in the final photo. 5) An alternative to using the post is to use a piece of clear glass laid across the top of the container with the specimen positioned on that surface with putty. This is easier for positioning the specimen but it creates other issues in that dust settling on the glass and any minute scratches in the glass will show up in the final photograph (see example at right). Unwanted reflections from the glass can also show in your final image. These imperfections can be removed in Photoshop but it can be a tedious process.
|
   |
With your light source properly placed to the upper left and directed 45 degrees down towards the specimen, all shadows will be cast out of the field of view to the lower right. The camera sees only the specimen and the inside bottom of your container. Since no light reaches this area, the background will be pure black.
Setting up the specimen
|
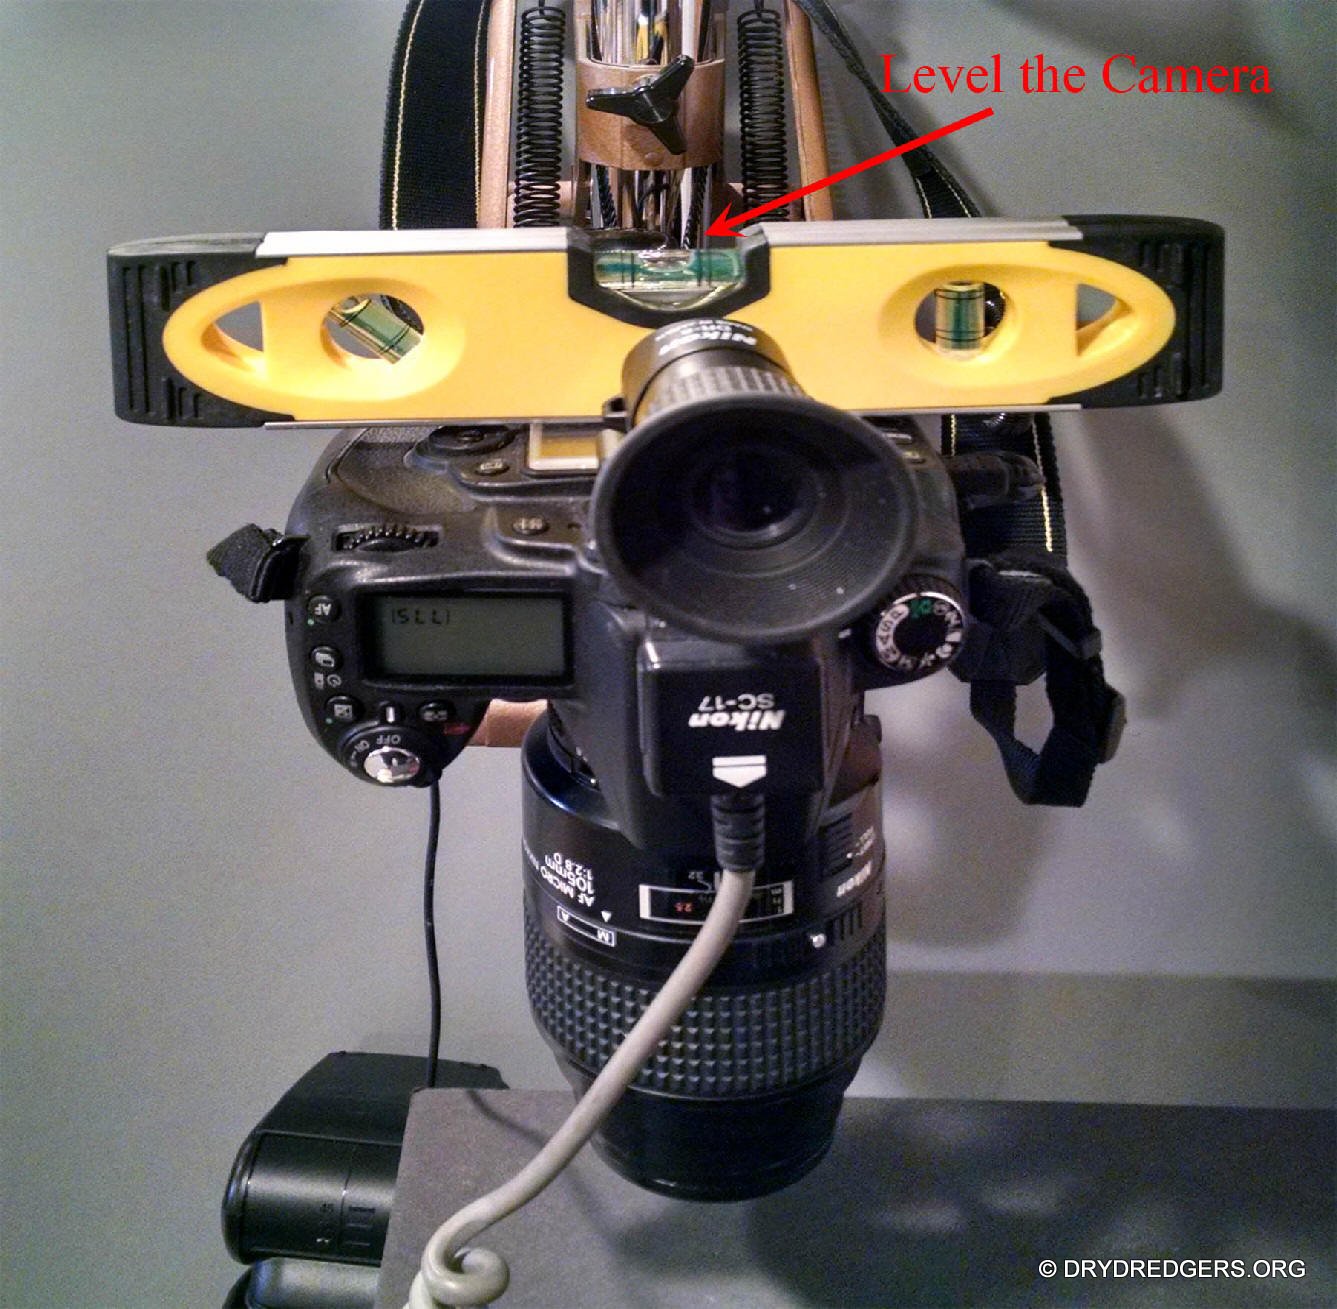
Positioning the specimen is an essential step to creating a good photograph. I have mentioned positioning the camera or cell phone so that it is pointing straight down. The reason for this is that gravity helps stabilize the specimen being photographed. It is of utmost importance that the fossil being photographed appear as flat as possible to the camera. I know this sounds strange but positioning is the first critical step in getting the best depth of field. The object in all cases is to make the plane of the specimen parallel to the plane of the camera"s sensor. The plane of the sensor is marked on DSLR camera bodies and is parallel to the flat back of the camera. I use a six inch spirit level on the back of the camera to be sure it is level in all directions. The platform used to support the specimen should be parallel to this as well. Alternatively, you can use the level on the front of the lens since that is also parallel to the back of the camera. Let"s look at a couple of examples: |
1) In the first example we want to photograph a Platystrophia acutilirata
looking down on the specimen from the top. This brachiopod has laterally
projecting wings. With the specimen held with a non-oily tacky putty, look at
the specimen from the front to be sure that the wings are in the same plane and
parallel to the camera"s sensor plane. If one wing is up and the other down
focusing will be an issue.


2) In the second example we want to photograph a specimen on a small slab. In this case again we must position the slab so that it is parallel to the camera"s sensor plane in both directions. This can be done by placing the slab on a flat surface under the camera and then shimming the slab as needed with putty or other objects (I use metal washers).
3) In the third example we want to photograph a particular specimen on a small slab and the specimen is not flat on the slab. In this case you will shim the slab so that the specimen, not the slab, is parallel to the camera"s sensor plane.
4) In the last example we want to photograph a cut and polished section of a large bryozoan. In this situation the specimen must be leveled in both directions with the spirit level used to set-up the camera. The plane of the camera"s sensor will now be perfectly parallel to the plane of the cut surface.
After these positioning adjustments, the scale should be placed in the field of view. The scale may need to be elevated to the level of the specimen so that it is in focus in the final image.
The last step is to blow any dust off the specimen using canned compressed air. This is available at office supply and computer stores.
It should be apparent that these steps may be more difficult to accomplish with a cell phone camera. When using a cell phone or small point and shoot camera every effort must be made to keep the camera parallel to the subject plane.
Photoshop is a most versatile software for manipulating and improving photographs. It is also very expensive to purchase the full package. This software has many more capabilities than most of us need for fossil photography. Fortunately, Photoshop has a lesser featured version called Photoshop Elements selling for around $99.00 that will be more than adequate for our purposes here.
I use PS Elements 10 to correct exposures, adjust shadows, replace backgrounds with a solid color, remove red eye on people, crop to size, crop out distracting parts of a photo, insert scale bars, insert arrows and text, combine multiple photos into one, correct color, convert photos to black & white, etc.
If you are interested in Photoshop Elements but unsure if you want to buy it, there is a free trial version that can be downloaded from the web. The latest version is Photoshop Elements 2018.
It is my hope that this series of tutorials on fossil photography has inspired you to improve your own photos and document your collection. When you first try some of these techniques you will find that the set-up is the most time consuming yet critical part. If done correctly, taking the photograph and any later modifications will be much easier.
Should you find all of this intriguing and inspiring but you lack the necessary equipment, I have some final suggestions. A DSLR system with a macro lens plus a copy stand and lighting can easily run into a four figure price tag. If you need to prioritize your equipment acquisitions, I recommend that you invest in higher quality camera and lens. Secondary equipment need not be top of the line. I recommend that you stay with name brands such as Nikon or Canon. These will likely cost more than other systems but there are advantages. Since I use Nikon I can speak to that system. A key advantage is that while the Nikon line continues to change, the lens mount system does not. This means that a brand new Nikon will allow me to mount my old macro lens. Some of the newer auto features may not be available but in fossil photography I use manual settings.
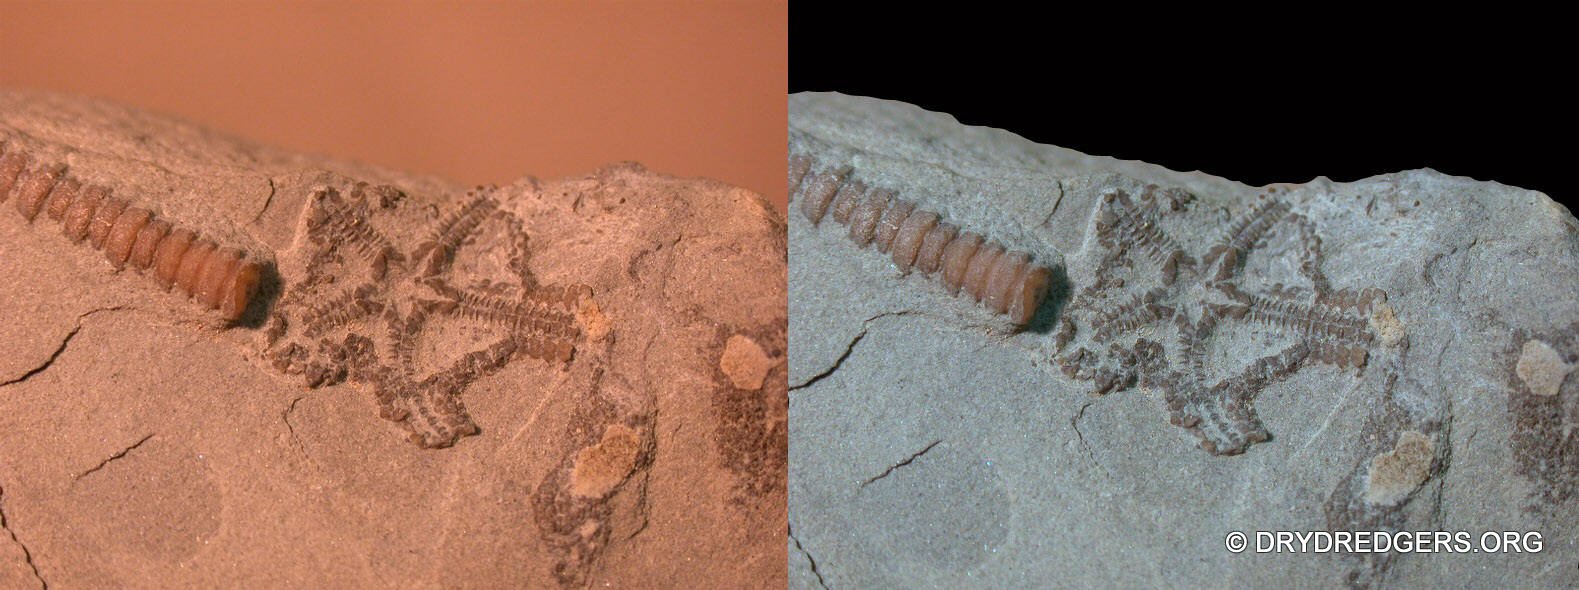
I frequently receive photographs from other people and quite a few need some work to make them true to life. The photographs below illustrate the power of Photoshop.
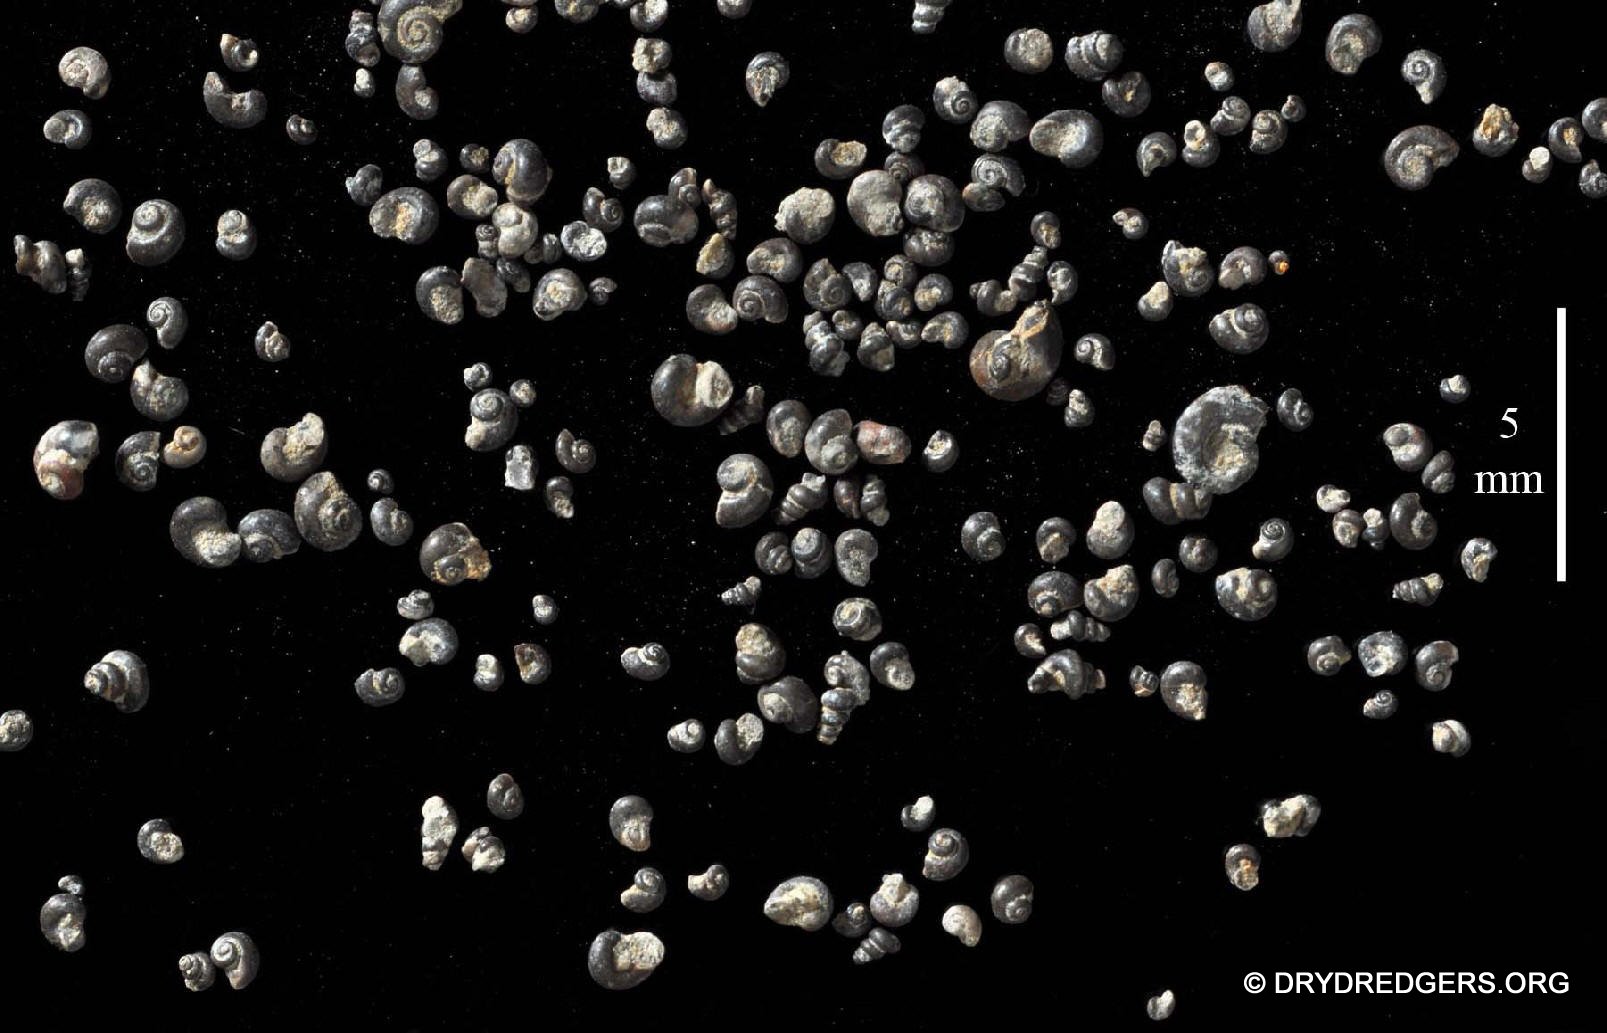
Ophiuroid from the Kope
Dendrocrinus caduceus Liberty
Back to the Dry Dredgers Home Page
The Dry Dredgers and individual contributors reserve the
rights to all information, images, and content presented here. Permission to
reproduce in any fashion, must be requested in writing to admin@drydredgers.org.
www.drydredgers.org is designed and maintained by Bill Heimbrock.